Cams Biometric Gateway — Web API 3.0
The Cams Biometric Gateway is the universal Biometric API that connects any biometric attendance or access control machine with your application — ERP, HRMS, payroll, school management, custom software, or AI/automation workflow. It supports all major device brands and provides a standardised JSON-over-HTTP Biometric API regardless of the hardware.
How It Works
The Biometric Gateway consists of:
Integrates With
| API Type | Direction | Latency | Use Case |
|---|---|---|---|
| Callback API | Device → Your Server | Real-time / zero latency | Receive attendance punches, user sync events |
| RESTful API | Your Server → Device | ~15 seconds | Add/delete users, load logs, enroll biometrics |
Getting Started
Integrate in three steps. Your server needs a publicly reachable URL to receive callbacks.
Configure your Callback URL
Log in to the API Monitor portal. Set your server's public HTTPS URL as the Callback URL for your device(s). The API engine will POST biometric events to this endpoint in real time.
Receive attendance punches
Your endpoint receives a POST with a raw JSON body — no query parameters needed for Callback APIs. Validate the AuthToken, parse the punch data, and respond with {"status":"done"}.
Call RESTful APIs to manage users & devices
POST a JSON command to the RESTful endpoint URL provided in your API Monitor account, with your stgid (Service Tag ID) as a query parameter. The engine queues the command and the device acknowledges within ~15 seconds.
Endpoint Format
| API Type | Method | How to send |
|---|---|---|
| Callback API (inbound) | POST | Device posts to your configured URL. Raw JSON body; no parameters. |
| RESTful API (outbound) | POST | You POST to the RESTful endpoint URL (found in your API Monitor account) with ?stgid=YOUR_SERVICE_TAG_ID and raw JSON body. |
{"status":"done"} (HTTP 200) to acknowledge receipt. Do not perform heavy processing before responding — queue it.
Machine Compatibility
The Cams Biometric Gateway supports all biometric attendance and access control machines. The only decision you make is which connection mode suits your setup.
Cams Machines
All machines at camsbiometrics.com/product. Full API — all 38 operations, no setup required.
Verified Devices
Devices verified at developer.camsbiometrics.com. Full API — all 38 operations.
All Other Brands
Any other machine works via Hybrid Push. You choose the connection mode that suits your setup — API features depend on the mode selected.
Supported Device Brands
Supported Authentication Modalities
Connection Modes & API Availability
Every biometric machine connects to the Cams Biometric Gateway through one of two push modes. Your device type determines which mode to use.
Native Push Cams & Verified Devices
All Cams Biometrics machines and devices verified at developer.camsbiometrics.com connect via Native Push. No additional setup needed — the device communicates directly with the Biometric Gateway over the internet.
Hybrid Push All Other Machines
For non-Cams and non-verified machines, you choose a Hybrid Push connection mode that suits your environment. The combination of communication method and deployment topology determines which API features are available.
Communication Methods
Deployment Topologies
Hybrid Push — Feature Availability Matrix
| Mode | Communication | Topology | Callback API | RESTful API |
|---|---|---|---|---|
| Direct Device | (a) SDK | (X) Public IP | Full | Full (SDK limits) |
| Indirect Device | (a) SDK | (Y) Hybrid Connector | Full | Full (SDK limits) |
| Direct DB | (b) DB Pull | (X) Public IP | Attendance only | Not supported |
| Indirect DB | (b) DB Pull | (Y) Hybrid Connector | Attendance only | Not supported |
| Direct File | (c) File | (X) Public IP | Attendance only | Not supported |
| Indirect File | (c) File | (Y) Hybrid Connector | Attendance only | Not supported |
API Architecture
| Property | Callback API | RESTful API |
|---|---|---|
| Initiator | Device / Biometric Gateway | Your server |
| Direction | Device → Your Server | Your Server → Device |
| Latency | Real-time (milliseconds) | ~15 seconds |
| Trigger | Biometric event on device | HTTP POST from your code |
| Your role | Receive & acknowledge | Send command & poll/wait for response |
| Response body | {"status":"done"} | {"Status":"done","OperationID":"…","StatusCode":0} |
| Offline behaviour | Cached by engine; delivered when server is back online | Queued by engine; delivered when device reconnects |
Common Fields
All requests — both Callback and RESTful — share these top-level fields.
"j95xfejt3vr1"). RESTful responses echo the same OperationID so you can match requests to responses.YYYY-MM-DD HH:mm:ss GMT +0000. Device-local timestamps within the payload may use a different timezone offset.POST https://<your-endpoint>?stgid=YOUR_TAG_ID.Template Types
Biometric and credential data is carried in a Template array. Each item has a Type field:
When user data is pushed from the device (Callback operations #3–#9), templates may arrive one at a time or in groups, across multiple callbacks. Each callback does not contain the user's full template set — it only carries the templates that were added or changed.
Your server must merge incoming templates with existing stored templates for that user. The unique key for each template is
Type + Index. For example:• Callback 1 arrives with
Fingerprint Index 0 → store it• Callback 2 arrives with
Face Index 0 + Card → merge, don't overwrite fingerprint• Callback 3 arrives with
Fingerprint Index 0 (new data) → update the existing fingerprint at Index 0Never replace all templates on a callback — always upsert by
Type + Index.
| Type | Description | Key extra fields |
|---|---|---|
Card | RFID / proximity card number | Data (card number string) |
Password | Numeric PIN | Data (PIN string) |
Fingerprint | Fingerprint template — Base64 encoded binary | Index (finger index 0–9), Size, Data |
Face | Face template — Base64 encoded JPEG or binary | Index, Size, Data |
Palm | Palm vein template — Base64 encoded binary | Index, Data |
UserPhoto | User profile photo — Base64 encoded JPEG | Data |
Response Status Codes
RESTful API responses include a numeric StatusCode. Callback API responses always use the simple {"status":"done"} form regardless of outcome.
| Code | Status | Description |
|---|---|---|
0 | Done | Operation completed successfully. |
1 | Invalid Request Data | The JSON body is malformed or contains invalid values. |
2 | Invalid Service Tag ID | The stgid query parameter does not match any registered device. |
3 | Invalid Origin IP | The request does not originate from a valid API origin configured in the system. |
5 | Invalid Subscription | The machine does not have a valid subscription, so real-time communication is blocked. |
7 | Invalid Auth Token | The AuthToken in the request does not match the device's configured token. |
9 | Invalid Start Time | The specified StartTime is not valid. |
10 | Invalid UserId | The specified UserId is not valid. |
14 | Invalid Operation Data | The specified Data from the Template object is not valid. |
19 | Invalid Raw Data | The raw data is not valid. |
26 | Invalid End Time | The specified EndTime is not valid. |
29 | Invalid Version | The request format does not match the configured API version. |
32 | Invalid Operation Id | The specified OperationId is not valid. |
34 | Invalid Access Type | The specified Access type reference is not valid. |
35 | Operation Not Allowded | The requested REST operation is restricted to this stgid . |
37 | Parallel Call Is Restriced | Operation ignored. Please avoid making sync calls for grouped machines. |
38 | Load PunchLog Not Allowded | The requested REST operation is restricted to this stgid . |
999 | Unknown Error | An unexpected error occurred. Contact Cams support with the OperationID. |
Callback APIs Device → Your Server · Operations 1–11
Note that not all APIs are supported in all the machines. Always get the confirmation from Cams, about the api supportability to your biometric machine
ManuallyUserDeleted
Callback APIDevice → ServerTriggered when a user is manually deleted directly on the device. Contains the UserID and deletion time.
{
  "RealTime": {
    "OperationID": "oy1kjign3sm7",
    "AuthToken": "COJJ7eiiPBGUfmIQPvh2PJWWDLX7OuKs",
    "Time": "2020-09-17 07:42:02 GMT +0000",
    "UserDeleted": {
      "UserID": "1",
      "OperationTime": "2020-09-17 13:12:02 GMT +0530"
    }
  }
}{ "status": "done" }ManuallyDateModified
Callback APIDevice → ServerTriggered when the device's date/time is manually changed. Reports the new value set.
{
  "RealTime": {
    "OperationID": "1aci5f5o6kbi1",
    "AuthToken": "COJJ7eiiPBGUfmIQPvh2PJWWDLX7OuKs",
    "Time": "2020-09-17 07:52:31 GMT +0000",
    "DateModified": {
      "ModifiedTo": "2020-09-17 10:22:24 GMT +0530",
      "OperationTime": "2020-09-17 13:22:31 GMT +0530"
    }
  }
}{ "status": "done" }ManuallyUserUpdatedWithoutTemplate
Callback APIDevice → ServerUser profile (name/type) updated on device — no biometric change. Template array is empty.
{
  "RealTime": {
    "UserUpdated": {
      "UserID": "1",
      "FirstName": "jency",
      "LastName": "mary",
      "UserType": "User",
      "OperationTime": "2020-09-16 18:45:34 GMT +0530",
      "Template": []
    },
    "LabelName": "Burj Khalifa",
    "SerialNumber": "ZHM11xxxxxxxx",
    "OperationID": "1vsyboxnuuorq",
    "AuthToken": "COJJ7eiiPBGUfmIQPvh2PJWWDLX7OuKs",
    "Time": "2020-09-16 13:15:33 GMT +0000"
  }
}{ "status": "done" }ManuallyUserUpdatedWithCard
Callback APIDevice → ServerUser updated on device with a card/RFID template. Data holds the card number.
{
  "RealTime": {
    "UserUpdated": {
      "UserID": "8", "FirstName": "", "LastName": "", "UserType": "User",
      "OperationTime": "2020-09-17 15:33:38 GMT +0530",
      "Template": [{ "Type": "Card", "UserID": "8", "Data": "9804445" }]
    },
    "LabelName": "Burj Khalifa",
    "SerialNumber": "ZHM11xxxxxxxx",
    "OperationID": "oldcu1ekxdbz",
    "AuthToken": "COJJ7eiiPBGUfmIQPvh2PJWWDLX7OuKs",
    "Time": "2020-09-17 10:03:38 GMT +0000"
  }
}{ "status": "done" }ManuallyUserUpdatedWithPassword
Callback APIDevice → ServerUser updated on device with a PIN/password. Data is the numeric PIN string.
{
  "RealTime": {
    "UserUpdated": {
      "UserID": "8", "FirstName": "", "LastName": "", "UserType": "User",
      "OperationTime": "2020-09-17 15:33:38 GMT +0530",
      "Template": [{ "Type": "Password", "UserID": "8", "Data": "124445" }]
    },
    "LabelName": "Burj Khalifa", "SerialNumber": "ZHM11xxxxxxxx",
    "OperationID": "oldcu1ekxdbz",
    "AuthToken": "COJJ7eiiPBGUfmIQPvh2PJWWDLX7OuKs",
    "Time": "2020-09-17 10:03:38 GMT +0000"
  }
}{ "status": "done" }ManuallyUserUpdatedWithFingerPrint
Callback APIDevice → ServerUser updated with fingerprint. Index = finger slot 0–9, Size = byte length, Data = Base64 binary.
{
  "RealTime": {
    "UserUpdated": {
      "OperationTime": "2020-09-17 12:48:28 GMT +0530",
      "Template": [{
        "Type": "Fingerprint", "UserID": "2",
        "Size": "1176", "Index": "6",
        "Data": "SjNTUzIxAAADcHcECAUHCc7Q..."
      }]
    },
    "LabelName": "Burj Khalifa", "SerialNumber": "ZHM11xxxxxxxx",
    "OperationID": "vq01h140jswo",
    "AuthToken": "COJJ7eiiPBGUfmIQPvh2PJWWDLX7OuKs",
    "Time": "2020-09-17 13:15:31 GMT +0000"
  }
}{ "status": "done" }ManuallyUserUpdatedWithFace
Callback APIDevice → ServerUser updated with a face template. Data is Base64-encoded JPEG or proprietary face binary (device-dependent).
{
  "RealTime": {
    "UserUpdated": {
      "OperationTime": "2020-09-17 19:04:55 GMT +0530",
      "Template": [{
        "Type": "Face", "UserID": "2",
        "Size": "28112", "Index": "0",
        "Data": "/9j/4AAQSkZJRgABAQAAAQABAAD..."
      }]
    },
    "LabelName": "Burj Khalifa", "SerialNumber": "ZHM11xxxxxxxx",
    "OperationID": "5qwmu986vm7c",
    "AuthToken": "COJJ7eiiPBGUfmIQPvh2PJWWDLX7OuKs",
    "Time": "2020-09-17 13:15:31 GMT +0000"
  }
}{ "status": "done" }ManuallyUserUpdatedWithPalm
Callback APIDevice → ServerUser updated with a palm vein template. Data is Base64-encoded palm binary.
{
  "RealTime": {
    "UserUpdated": {
      "OperationTime": "2020-09-17 19:10:12 GMT +0530",
      "Template": [{
        "Type": "Palm", "UserID": "2", "Index": "0",
        "Data": "apUBEOAHv98IAAwAAc/qAgzWDlDL..."
      }]
    },
    "LabelName": "Burj Khalifa", "SerialNumber": "ZHM11xxxxxxxx",
    "OperationID": "p3rm9kqx1yz0",
    "AuthToken": "COJJ7eiiPBGUfmIQPvh2PJWWDLX7OuKs",
    "Time": "2020-09-17 13:40:12 GMT +0000"
  }
}{ "status": "done" }ManuallyUserUpdatedWithUserPhoto
Callback APIDevice → ServerUser updated with a profile photo. Data is Base64-encoded JPEG.
{
  "RealTime": {
    "UserUpdated": {
      "UserID": "5", "FirstName": "Alex", "LastName": "Thomas",
      "UserType": "User",
      "OperationTime": "2020-09-17 20:00:00 GMT +0530",
      "Template": [{ "Type": "UserPhoto", "UserID": "5", "Data": "/9j/4AAQSkZJRgABAQAAAQABAAD..." }]
    },
    "LabelName": "Burj Khalifa", "SerialNumber": "ZHM11xxxxxxxx",
    "OperationID": "up9h2bxk7q11",
    "AuthToken": "COJJ7eiiPBGUfmIQPvh2PJWWDLX7OuKs",
    "Time": "2020-09-17 14:30:00 GMT +0000"
  }
}{ "status": "done" }RealTimeAttendancePhoto
Callback APIDevice → ServerReal-time punch event with a captured snapshot (for devices with photo capture). LogPhoto is Base64-encoded JPEG.
{
  "RealTime": {
    "Log": {
      "UserID": "3",
      "LogPhoto": "/9j/4AAQSkZJRgABAQAAAQABAAD...",
      "LogTime": "2020-09-17 07:48:30 GMT +0530"
    },
    "OperationID": "x58636uon24u",
    "AuthToken": "COJJ7eiiPBGUfmIQPvh2PJWWDLX7OuKs",
    "Time": "2020-09-17 04:19:18 GMT +0000"
  }
}{ "status": "done" }RealTimePunchLog
Callback APIDevice → ServerPrimary real-time attendance event — fires on every punch. Includes type, input method, temperature, and face-mask status.
{
  "RealTime": {
    "OperationID": "9nu1wak5616p",
    "LabelName": "Burj Khalifa",
    "SerialNumber": "ZHM11xxxxxxxx",
    "PunchLog": {
      "Type": "CheckOut",
      "Temperature": "36.8",
      "FaceMask": false,
      "InputType": "Fingerprint",
      "UserId": "2",
      "LogTime": "2020-09-17 07:48:22 GMT +0530"
    },
    "AuthToken": "COJJ7eiiPBGUfmIQPvh2PJWWDLX7OuKs",
    "Time": "2020-09-17 04:19:03 GMT +0000"
  }
}{ "status": "done" }RESTful APIs Your Server → Device · Operations 12–38
LoadLog
RESTful APIServer → DeviceRetrieves attendance punch logs from the device within a time window. Recommended max range: 30 days.
{
  "Load": {
    "PunchLog": {
      "Filter": {
        "StartTime": "2020-09-17 00:01:33 GMT +0530",
        "EndTime": "2020-09-17 22:01:33 GMT +0530"
      }
    }
  },
  "OperationID": "j95xfejt3vr1",
  "AuthToken": "COJJ7eiiPBGUfmIQPvh2PJWWDLX7OuKs",
  "Time": "2020-09-17 12:01:33 GMT +0530"
}{
"Status": "done",
"OperationID": "j95xfejt3vr1",
"PunchLog": {
"ReturnRowCount": "18",
"Log": [
{ "Type": "CheckOut", "Temperature": 36.8, "InputType": "Face", "UserID": "2", "LogTime": "2020-09-17 16:53:43 GMT +0530", "FaceMask": false },
{ "Type": "CheckOut", "Temperature": 36.6, "InputType": "Palm", "UserID": "1", "LogTime": "2020-09-17 16:54:15 GMT +0530", "FaceMask": false },
{ "Type": "CheckIn", "Temperature": 36.5, "InputType": "Fingerprint", "UserID": "3", "LogTime": "2020-09-17 09:01:44 GMT +0530", "FaceMask": false }
]
}
}LoadDeviceInformation
RESTful APIServer → DeviceRetrieves hardware details, capacity limits, registered user/template counts, and license dates from the device.
{
  "Load": { "DeviceInformation": "All" },
  "OperationID": "j95xfejt3vr1",
  "AuthToken": "COJJ7eiiPBGUfmIQPvh2PJWWDLX7OuKs",
  "Time": "2020-08-28 12:01:33 GMT +0530"
}{
"Status": "done",
"OperationID": "j95xfejt3vr1",
"StatusCode": 0,
"DeviceInformation": {
"DeviceModel": "Hawking Plus (f38+)",
"Manufacturer": "Dheeram Innovations",
"MacAddress": "00-01-A9-16-27-AB",
"StartDate": "03/04/2024",
"EndDate": "03/04/2025",
"LastConnectedTime": "13-11-2025 18:03:48 GMT +0530",
"RegisteredUsers": "0",
"RegisteredFaces": "0",
"RegisteredFingerprints": "0",
"MaximumFacesSupported": "5000",
"MaximumFingerprintsSupported": "10000",
"MaximumAttendanceLogsSupported": "500000"
}
}AddUserWithCard
RESTful APIServer → DeviceRegisters a new user with a card/RFID number as their only credential.
{
  "Add": {
    "User": { "UserID": "100", "FirstName": "Manu", "LastName": "Mona", "UserType": "USER" },
    "Template": [{ "Type": "Card", "UserID": "100", "Data": "102836" }]
  },
  "OperationID": "1jxpjeoasu8wl",
  "AuthToken": "COJJ7eiiPBGUfmIQPvh2PJWWDLX7OuKs",
  "Time": "2020-09-17 11:09:09 GMT +0530"
}{ "Status": "done", "OperationID": "1jxpjeoasu8wl", "StatusCode": 0 }AddUserWithPassword
RESTful APIServer → DeviceRegisters a new user with a numeric PIN/password as their only credential.
{
  "Add": {
    "User": { "UserID": "100", "FirstName": "Manu", "LastName": "Mona", "UserType": "USER" },
    "Template": [{ "Type": "Password", "UserID": "100", "Data": "123456" }]
  },
  "OperationID": "1jxpjeoasu8wl",
  "AuthToken": "COJJ7eiiPBGUfmIQPvh2PJWWDLX7OuKs",
  "Time": "2020-09-17 11:09:09 GMT +0530"
}{ "Status": "done", "OperationID": "1jxpjeoasu8wl", "StatusCode": 0 }AddUserWithFace
RESTful APIServer → DeviceRegisters a user with a face template. Data is Base64-encoded JPEG or device-specific binary. Size is the byte length.
{
  "Add": {
    "User": { "UserID": "100", "FirstName": "Manu", "LastName": "Mona", "UserType": "USER" },
    "Template": [{ "Type": "Face", "UserID": "100", "Size": "25072", "Index": "0", "Data": "/9j/4AAQSkZJRgABAQAAAQABAAD..." }]
  },
  "OperationID": "1jxpjeoasu8wl",
  "AuthToken": "COJJ7eiiPBGUfmIQPvh2PJWWDLX7OuKs",
  "Time": "2020-09-17 11:09:09 GMT +0530"
}{ "Status": "done", "OperationID": "1jxpjeoasu8wl", "StatusCode": 0 }AddUserWithFingerPrint
RESTful APIServer → DeviceRegisters a user with one fingerprint template. Index specifies the finger slot (0–9).
{
  "Add": {
    "User": { "UserID": "100", "FirstName": "Manu", "LastName": "Mona", "UserType": "USER" },
    "Template": [{ "Type": "Fingerprint", "UserID": "100", "Size": "1176", "Index": "0", "Data": "TW9TUzIxAAAELC4ECAUHCc7Q..." }]
  },
  "OperationID": "1jxpjeoasu8wl",
  "AuthToken": "COJJ7eiiPBGUfmIQPvh2PJWWDLX7OuKs",
  "Time": "2020-09-17 11:09:09 GMT +0530"
}{ "Status": "done", "OperationID": "1jxpjeoasu8wl", "StatusCode": 0 }AddUserWithPalm
RESTful APIServer → DeviceRegisters a user with a palm vein template. Data is Base64-encoded palm binary.
{
  "Add": {
    "User": { "UserID": "100", "FirstName": "Manu", "LastName": "Mona", "UserType": "USER" },
    "Template": [{ "Type": "Palm", "UserID": "100", "Index": "0", "Data": "apUBEOAHv98IAAwAAc/qAgzWDlDL..." }]
  },
  "OperationID": "1jxpjeoasu8wl",
  "AuthToken": "COJJ7eiiPBGUfmIQPvh2PJWWDLX7OuKs",
  "Time": "2020-09-17 11:09:09 GMT +0530"
}{ "Status": "done", "OperationID": "1jxpjeoasu8wl", "StatusCode": 0 }AddUserWithUserPhoto
RESTful APIServer → DeviceRegisters a user with a profile photo stored on the device. Data is Base64-encoded JPEG.
{
  "Add": {
    "User": { "UserID": "100", "FirstName": "Manu", "LastName": "Mona", "UserType": "USER" },
    "Template": [{ "Type": "UserPhoto", "UserID": "100", "Data": "/9j/4AAQSkZJRgABAQAAAQABAAD..." }]
  },
  "OperationID": "1jxpjeoasu8wl",
  "AuthToken": "COJJ7eiiPBGUfmIQPvh2PJWWDLX7OuKs",
  "Time": "2020-09-17 11:09:09 GMT +0530"
}{ "Status": "done", "OperationID": "1jxpjeoasu8wl", "StatusCode": 0 }AddUserWithCardAndPassword
RESTful APIServer → DeviceRegisters a user with both a card number and a PIN — two entries in the Template array.
{
  "Add": {
    "User": { "UserID": "100", "FirstName": "Manu", "LastName": "Mona", "UserType": "USER" },
    "Template": [
      { "Type": "Card",     "UserID": "100", "Data": "102836" },
      { "Type": "Password", "UserID": "100", "Data": "123456" }
    ]
  },
  "OperationID": "1jxpjeoasu8wl",
  "AuthToken": "COJJ7eiiPBGUfmIQPvh2PJWWDLX7OuKs",
  "Time": "2020-09-17 11:09:09 GMT +0530"
}{ "Status": "done", "OperationID": "1jxpjeoasu8wl", "StatusCode": 0 }AddUserWithCardAndFingerPrint
RESTful APIServer → DeviceRegisters a user with a card number and one fingerprint template.
{
  "Add": {
    "User": { "UserID": "100", "FirstName": "Manu", "LastName": "Mona", "UserType": "USER" },
    "Template": [
      { "Type": "Card",        "UserID": "100", "Data": "102836" },
      { "Type": "Fingerprint", "UserID": "100", "Size": "1176", "Index": "0", "Data": "TW9TUzIxAAAELC4E..." }
    ]
  },
  "OperationID": "1jxpjeoasu8wl",
  "AuthToken": "COJJ7eiiPBGUfmIQPvh2PJWWDLX7OuKs",
  "Time": "2020-09-17 11:09:09 GMT +0530"
}{ "Status": "done", "OperationID": "1jxpjeoasu8wl", "StatusCode": 0 }AddUserWithPalmAndFace
RESTful APIServer → DeviceRegisters a user with both a palm vein and a face template.
{
  "Add": {
    "User": { "UserID": "100", "FirstName": "Manu", "LastName": "Mona", "UserType": "USER" },
    "Template": [
      { "Type": "Palm", "UserID": "100", "Index": "0", "Data": "apUBEOAHv98IAAwA..." },
      { "Type": "Face", "UserID": "100", "Size": "25072", "Index": "0", "Data": "/9j/4AAQSkZJRgAB..." }
    ]
  },
  "OperationID": "1jxpjeoasu8wl",
  "AuthToken": "COJJ7eiiPBGUfmIQPvh2PJWWDLX7OuKs",
  "Time": "2020-09-17 11:09:09 GMT +0530"
}{ "Status": "done", "OperationID": "1jxpjeoasu8wl", "StatusCode": 0 }AddUserWithCard_FingerPrintAndFace
RESTful APIServer → DeviceRegisters a user with card, fingerprint, and face — three templates.
{
  "Add": {
    "User": { "UserID": "100", "FirstName": "Manu", "LastName": "Mona", "UserType": "USER" },
    "Template": [
      { "Type": "Card",        "UserID": "100", "Data": "102836" },
      { "Type": "Fingerprint", "UserID": "100", "Size": "1176", "Index": "0", "Data": "TW9TUzIxAAAELC4E..." },
      { "Type": "Face",        "UserID": "100", "Size": "25072", "Index": "0", "Data": "/9j/4AAQSkZJRgAB..." }
    ]
  },
  "OperationID": "1jxpjeoasu8wl",
  "AuthToken": "COJJ7eiiPBGUfmIQPvh2PJWWDLX7OuKs",
  "Time": "2020-09-17 11:09:09 GMT +0530"
}{ "Status": "done", "OperationID": "1jxpjeoasu8wl", "StatusCode": 0 }AddUserWithCard_PalmAndUserPhoto
RESTful APIServer → DeviceRegisters a user with card, palm vein, and profile photo — three templates.
{
  "Add": {
    "User": { "UserID": "100", "FirstName": "Manu", "LastName": "Mona", "UserType": "USER" },
    "Template": [
      { "Type": "Card",      "UserID": "100", "Data": "102836" },
      { "Type": "Palm",      "UserID": "100", "Index": "0", "Data": "apUBEOAHv98IAAwA..." },
      { "Type": "UserPhoto", "UserID": "100", "Data": "/9j/4AAQSkZJRgAB..." }
    ]
  },
  "OperationID": "1jxpjeoasu8wl",
  "AuthToken": "COJJ7eiiPBGUfmIQPvh2PJWWDLX7OuKs",
  "Time": "2020-09-17 11:09:09 GMT +0530"
}{ "Status": "done", "OperationID": "1jxpjeoasu8wl", "StatusCode": 0 }AddUserWithCard_Password_FingerPrintAndFace
RESTful APIServer → DeviceRegisters a user with card, password, fingerprint, and face — four templates.
{
  "Add": {
    "User": { "UserID": "100", "FirstName": "Manu", "LastName": "Mona", "UserType": "USER" },
    "Template": [
      { "Type": "Card",        "UserID": "100", "Data": "102836" },
      { "Type": "Password",    "UserID": "100", "Data": "123456" },
      { "Type": "Fingerprint", "UserID": "100", "Size": "1176", "Index": "0", "Data": "TW9TUzIxAAAELC4E..." },
      { "Type": "Face",        "UserID": "100", "Size": "25072", "Index": "0", "Data": "/9j/4AAQSkZJRgAB..." }
    ]
  },
  "OperationID": "1jxpjeoasu8wl",
  "AuthToken": "COJJ7eiiPBGUfmIQPvh2PJWWDLX7OuKs",
  "Time": "2020-09-17 11:09:09 GMT +0530"
}{ "Status": "done", "OperationID": "1jxpjeoasu8wl", "StatusCode": 0 }AddUserWithCard_Password_PalmAndUserPhoto
RESTful APIServer → DeviceRegisters a user with card, password, palm vein, and profile photo — four templates.
{
  "Add": {
    "User": { "UserID": "100", "FirstName": "Manu", "LastName": "Mona", "UserType": "USER" },
    "Template": [
      { "Type": "Card",      "UserID": "100", "Data": "102836" },
      { "Type": "Password",  "UserID": "100", "Data": "123456" },
      { "Type": "Palm",      "UserID": "100", "Index": "0", "Data": "apUBEOAHv98IAAwA..." },
      { "Type": "UserPhoto", "UserID": "100", "Data": "/9j/4AAQSkZJRgAB..." }
    ]
  },
  "OperationID": "1jxpjeoasu8wl",
  "AuthToken": "COJJ7eiiPBGUfmIQPvh2PJWWDLX7OuKs",
  "Time": "2020-09-17 11:09:09 GMT +0530"
}{ "Status": "done", "OperationID": "1jxpjeoasu8wl", "StatusCode": 0 }AddUserWithCard_FingerPrint_Password_Face_PalmAndUserPhoto
RESTful APIServer → DeviceRegisters a user with all six credential types — card, fingerprint, password, face, palm, and profile photo.
{
  "Add": {
    "User": { "UserID": "100", "FirstName": "Manu", "LastName": "Mona", "UserType": "USER" },
    "Template": [
      { "Type": "Card",        "UserID": "100", "Data": "102836" },
      { "Type": "Password",    "UserID": "100", "Data": "123456" },
      { "Type": "Fingerprint", "UserID": "100", "Size": "1176", "Index": "0", "Data": "TW9TUzIxAAAELC4E..." },
      { "Type": "Face",        "UserID": "100", "Size": "25072", "Index": "0", "Data": "/9j/4AAQSkZJRgAB..." },
      { "Type": "Palm",        "UserID": "100", "Index": "0",    "Data": "apUBEOAHv98IAAwA..." },
      { "Type": "UserPhoto",   "UserID": "100", "Data": "/9j/4AAQSkZJRgAB..." }
    ]
  },
  "OperationID": "1jxpjeoasu8wl",
  "AuthToken": "COJJ7eiiPBGUfmIQPvh2PJWWDLX7OuKs",
  "Time": "2020-09-17 11:09:09 GMT +0530"
}{ "Status": "done", "OperationID": "1jxpjeoasu8wl", "StatusCode": 0 }AddUserWithoutTemplate
RESTful APIServer → DeviceCreates a user record on the device with no biometric data. Useful to pre-register before enrolling templates separately.
{
  "Add": {
    "User": { "UserID": "1", "FirstName": "Manu", "LastName": "Mona", "UserType": "User" }
  },
  "OperationID": "1jxpjeoasu8wl",
  "AuthToken": "COJJ7eiiPBGUfmIQPvh2PJWWDLX7OuKs",
  "Time": "2020-09-17 11:09:09 GMT +0530"
}{ "Status": "done", "OperationID": "1jxpjeoasu8wl", "StatusCode": 0 }DeleteUser
RESTful APIServer → DeviceDeletes a specific user and all their biometric templates from the device.
{
  "Delete": { "User": { "UserID": "User123" } },
  "OperationID": "1jxpjeoasu8wl",
  "AuthToken": "COJJ7eiiPBGUfmIQPvh2PJWWDLX7OuKs",
  "Time": "2020-09-11 16:15:31 GMT +0530"
}{ "Status": "done", "OperationID": "1jxpjeoasu8wl", "StatusCode": 0 }DeleteAllUser
RESTful APIServer → DeviceDeletes all users and their biometric templates from the device. Irreversible.
{
  "Delete": { "User": "All" },
  "OperationID": "j95xfejt3vr1",
  "AuthToken": "COJJ7eiiPBGUfmIQPvh2PJWWDLX7OuKs",
  "Time": "2020-09-17 12:01:33 GMT +0530"
}{ "Status": "done", "OperationID": "j95xfejt3vr1", "StatusCode": 0 }DeleteLogAll
RESTful APIServer → DeviceClears all attendance punch logs from the device. User records and templates are not affected.
{
  "Delete": { "Log": "All" },
  "OperationID": "j95xfejt3vr1",
  "AuthToken": "COJJ7eiiPBGUfmIQPvh2PJWWDLX7OuKs",
  "Time": "2020-09-17 12:01:33 GMT +0530"
}{ "Status": "done", "OperationID": "j95xfejt3vr1", "StatusCode": 0 }DeleteAttendancePhoto
RESTful APIServer → DeviceDeletes all punch photos stored on the device. Applies to devices with photo capture capability.
{
  "Delete": { "PunchPhoto": "All" },
  "OperationID": "j95xfejt3vr1",
  "AuthToken": "COJJ7eiiPBGUfmIQPvh2PJWWDLX7OuKs",
  "Time": "2020-09-17 12:01:33 GMT +0530"
}{ "Status": "done", "OperationID": "j95xfejt3vr1", "StatusCode": 0 }ResendAttendance
RESTful APIServer → DeviceInstructs the device to re-push attendance logs within a time range to your server via Callback. Useful for recovering missed records.
{
  "OperationID": "j95xfejt3vr1",
  "Resend": {
    "PunchLog": {
      "Filter": {
        "StartTime": "2020-09-17 15:49:33 GMT +0530",
        "EndTime": "2020-09-17 16:20:33 GMT +0530"
      }
    }
  },
  "AuthToken": "COJJ7eiiPBGUfmIQPvh2PJWWDLX7OuKs",
  "Time": "2020-09-17 12:01:33 GMT +0530"
}{ "Status": "done", "OperationID": "j95xfejt3vr1", "StatusCode": 0 }ResendAllUser
RESTful APIServer → DeviceInstructs the device to re-push all registered user data (profiles and templates) to your server via Callback.
{
  "OperationID": "j95xfejt3vr1",
  "Resend": { "User": "All" },
  "AuthToken": "COJJ7eiiPBGUfmIQPvh2PJWWDLX7OuKs",
  "Time": "2020-09-17 12:01:33 GMT +0530"
}{ "Status": "done", "OperationID": "j95xfejt3vr1", "StatusCode": 0 }EnrollFingerPrint
RESTful APIServer → DeviceTriggers the device to start an on-device fingerprint enrollment session. The user must be physically present at the device.
{
  "Enroll": {
    "User": { "UserID": "3", "Type": "Fingerprint", "FirstName": "Rajesh", "LastName": "Ragavendhar" }
  },
  "OperationID": "1jxpjeoasu8wl",
  "AuthToken": "COJJ7eiiPBGUfmIQPvh2PJWWDLX7OuKs",
  "Time": "2025-09-25 11:09:09 GMT +0530"
}{ "Status": "done", "OperationID": "1jxpjeoasu8wl", "StatusCode": 0 }UpdateAccessTime
RESTful APIServer → DeviceSets a time-bound access window for a user. The user can only authenticate within the specified start–end range.
{
  "Update": {
    "AccessTime": { "UserID": "20", "Start": "2022-07-11 00:00:00", "End": "2022-07-11 23:59:59" }
  },
  "OperationID": "1jxpjeoasu8wl",
  "AuthToken": "COJJ7eiiPBGUfmIQPvh2PJWWDLX7OuKs",
  "Time": "2020-09-11 16:39:29 GMT +0530"
}{ "Status": "done", "OperationID": "1jxpjeoasu8wl", "StatusCode": 0 }EnableUser
RESTful APIServer → DeviceRe-enables a previously disabled user, restoring their ability to authenticate on the device.
{
  "Update": { "User": { "UserID": "1", "Access": "enable" } },
  "OperationID": "1jxpjeoasu8wl",
  "AuthToken": "COJJ7eiiPBGUfmIQPvh2PJWWDLX7OuKs",
  "Time": "2020-09-17 11:09:09 GMT +0530"
}{ "Status": "done", "OperationID": "1jxpjeoasu8wl", "StatusCode": 0 }DisableUser
RESTful APIServer → DeviceDisables a user without deleting them. Record and templates are kept but authentication is blocked until re-enabled.
{
  "Update": { "User": { "UserID": "1", "Access": "disable" } },
  "OperationID": "1jxpjeoasu8wl",
  "AuthToken": "COJJ7eiiPBGUfmIQPvh2PJWWDLX7OuKs",
  "Time": "2020-09-17 11:09:09 GMT +0530"
}{ "Status": "done", "OperationID": "1jxpjeoasu8wl", "StatusCode": 0 }Additional Information
Ports Supported
To receive real-time attendance information, your server must expose an HTTP(S) endpoint that the Cams Protocol Engine can reach.
| Port | Protocol | Usage |
|---|---|---|
80 | HTTP | Production. Bind your callback URL to port 80. Configured in the API Monitor and called automatically on punches. |
443 | HTTPS | Production (secure). HTTPS with valid SSL certificate. Recommended for production. |
8123 | HTTP | Testing only. Non-standard port temporarily available during development. |
Sample Data
Sample request and response payloads for all 38 operations are documented above in each operation section. For a consolidated view:
Integration & Synchronization Best Practices
Architectural patterns, data flow expectations, and known limitations when integrating your ERP system with the biometric hardware API.
1. Real-Time Punch Log Handling
2. User Data Synchronization Strategy
A. Initial Onboarding & Bulk Fetching (Hardware → ERP)
Because commands sent to the hardware are asynchronous, the hardware streams data back incrementally based on its network bandwidth and internal memory capacity. Both methods below ultimately trigger a ManuallyUserUpdated webhook payload for each user.
Method 1: Selective Fetching Recommended
For Cams machines, Invoke the ResendUserList REST command to retrieve all active user IDs from the machine. Then iterate through the IDs and call ResendUser{ID} to fetch the complete biometric data profile for specific users.
Method 2: Bulk Fetching (ResendAllUsers)
for all machines, Trigger ResendAllUsers to dump all user data to the ERP.
B. Incremental Changes & Deletions
ManuallyUserUpdated webhook.C. Provisioning Users (ERP → Hardware)
AddUser REST command to push new users from the ERP to the hardware.3. Device Grouping
Machines can be grouped within the Cams Console. Grouping ensures that whenever a ManuallyUserUpdated event is triggered, the changes are automatically reflected and propagated across all other machines in that specific group.
Known Issues & Limitations
ResendAllUsers or ResendUser{ID} at an expected failure rate of 0.1%–0.3%.
Remediation — if a user profile fails to sync or becomes unrecoverable, resolve it using one of the following:
Re-enroll on the machine
Re-enroll the user's biometric data directly on the biometric machine.
Delete & re-add manually
Manually delete the user from the hardware interface (do not use the API) and re-add them.
Encryption
Optional AES-256 encryption can be enabled for all data exchanged between the Cams Protocol Engine and your server.
AES/ECB/PKCS5PADDING).Java Example
// Encryption
Cipher cipher = Cipher.getInstance("AES/ECB/PKCS5PADDING");
SecretKeySpec keySpec = new SecretKeySpec(securityKey.getBytes("UTF-8"), "AES");
cipher.init(Cipher.ENCRYPT_MODE, keySpec);
String encrypted = Base64.getEncoder().encodeToString(cipher.doFinal(rawJson.getBytes("UTF-8")));

// Decryption
cipher.init(Cipher.DECRYPT_MODE, keySpec);
byte[] decoded = Base64.getDecoder().decode(encryptedPayload);
String decrypted = new String(cipher.doFinal(decoded), "UTF-8");Biometric Attendance SDK
Cams does not provide a traditional SDK. All operations use standard HTTP Callback and RESTful APIs — no library installation needed.
This makes integration straightforward with any web platform:
Cost of API
API licenses are billed per biometric machine. First-year = activation + license; subsequent years = license renewal only.
| Service | USD | INR | Notes |
|---|---|---|---|
| Native Push — Cams & Verified Devices | |||
| API Activation | $120 | ₹5,750 | One-time per machine. |
| Yearly API License | $60 – $120 | ₹3,000 – ₹6,000 | Annual renewal required. |
| Protocol Update (non-Cams) | $120 – $280 | ₹3,000 – ₹6,000 | One-time. Enables Cams protocol on non-Cams devices. |
| Hybrid Push — ZKTeco, eSSL & All Third-Party Brands | |||
| API Activation | $150 | ₹7,500 | One-time per machine. |
| Yearly API License | $90 – $150 | ₹4,500 – ₹7,500 | Annual renewal required. |
| Hybrid Connector (non-verified) | $150 – $300 | ₹7,500 – ₹15,000 | One-time. Required for non-verified devices using Hybrid Push. |
| Hardware & Other | |||
| Hardware | $220 – $720 | ₹9,000 – ₹60,000 | Varies by model. |
Frequently Asked Questions
Common questions about integrating with the Cams Biometrics Web API 3.0.
General
The Cams Biometric Gateway is a universal cloud platform that exposes a Biometric API enabling any web application to communicate with biometric attendance and access control devices in real time. It supports 38 operations across Callback (inbound) and RESTful (outbound) APIs — without requiring any device SDK or static IP.
No. Cams does not provide or require an SDK. All communication uses standard HTTP/HTTPS POST requests with JSON payloads. Any language that can make HTTP calls will work.
Any language that can send/receive HTTP POST with JSON — PHP, Python, Java, C#, Node.js, Go, Ruby, and more. We provide AI code generator prompts for 7 languages.
It is the cloud middleware that sits between biometric devices and your server. It handles protocol translation, data normalization, offline caching, and delivers a consistent JSON API regardless of the underlying device brand or model.
The API Monitor is your admin portal where you configure Callback URLs, manage AuthTokens, set Security Keys, view device status, and access your RESTful endpoint URL and Service Tag IDs.
Device Compatibility
All Cams Biometrics machines (listed at camsbiometrics.com/product) support the full API with Native Push. Devices verified at developer.camsbiometrics.com also have full Native Push support.
Yes, with a Protocol Update. Non-Cams and non-verified devices operate via Hybrid Push. Some features may be limited depending on the connection mode and hardware capabilities.
Native Push: Full API support with no limitations — all 38 operations work. Available for Cams machines and verified devices.
Hybrid Push: For non-Cams/non-verified devices. Feature availability depends on the communication mode (SDK, DB Pull, or File Processing). See Connection Modes.
Fingerprint, facial recognition, palm vein, RFID/proximity card, numeric PIN/password, iris scanning, and body temperature measurement (device-dependent).
This depends on (a) the connection mode — DB Pull and File Processing modes only support attendance push, not RESTful APIs, and (b) hardware limitations — some device models may not support specific features at the firmware level. Test with your hardware and contact Cams support for assistance.
Callback API (Device → Server)
The Callback API delivers real-time events from biometric devices to your server. When a punch occurs or a user is modified on the device, the Cams Protocol Engine immediately POSTs a JSON payload to your configured Callback URL.
Always return
{"status":"done"} with HTTP status 200 — even if your internal processing fails. Never block the Cams Protocol Engine. Queue heavy processing for async execution.The Biometric Gateway caches all events and delivers them automatically once your server is back online. No data is lost.
Implement duplicate-detection logic on your server using the combination of
UserID + LogTime. The same punch may be re-sent during offline recovery or network retries.CheckIn, CheckOut, BreakOut, BreakIn, OverTimeIn, OverTimeOut, MealIn, MealOut. The InputType field shows the biometric method used: Fingerprint, Face, Palm, Card, or Password.When a user is updated on the device (operations #3–#9), templates may arrive one at a time or in groups across multiple callbacks. Each callback only carries templates that changed — not the full set. Your server must merge/upsert by
Type + Index as the unique key. Never overwrite all templates on a single callback.Yes. Operation #10 RealTimeAttendancePhoto delivers a Base64-encoded JPEG snapshot captured at punch time. This is separate from the punch log callback (#11) and available on devices with camera support.
Yes, if the device supports it. The
PunchLog object includes Temperature (body temperature reading) and FaceMask (boolean — whether a face mask was detected).RESTful API (Server → Device)
The RESTful API lets your server send commands to biometric devices — adding/deleting users, loading logs, enrolling biometrics, and controlling access. You POST JSON to the endpoint URL found in your API Monitor account.
Log in to your API Monitor account. Your RESTful endpoint URL and Service Tag IDs (
stgid) are listed there.Approximately 15 seconds. The Biometric Gateway queues your command and delivers it to the device when it next connects (which is near-continuous for online devices).
Recommended max is 30 days per request. For larger ranges, make multiple requests with consecutive time windows.
Yes. The Template array accepts multiple entries. For example, operation #27 adds a user with Card + Fingerprint + Password + Face + Palm + UserPhoto all in one request.
The Biometric Gateway queues the command and delivers it automatically when the device reconnects. You'll receive status code
5 (Device Offline) if the device doesn't respond within the timeout window.RESTful responses include a
StatusCode field. Code 0 means success. See Response Status Codes for the full list of error codes and their meanings.Yes. Operation #35 EnrollFingerPrint triggers an on-device enrollment session. However, the user must be physically present at the device to scan their finger.
Security & Networking
Yes. HTTPS with a valid SSL certificate on port 443 is fully supported and recommended for production.
No. AES-256 encryption is optional. To enable it, configure a Security Key in the API Monitor. When enabled, all JSON payloads are encrypted/decrypted using AES/ECB/PKCS5PADDING with Base64 encoding.
Every callback includes an
AuthToken field. Compare it against the token configured in your API Monitor. Reject any request with a mismatched token.Port
80 (HTTP) or 443 (HTTPS) for production. Port 8123 is available for testing only. See Ports Supported.Use a public IP with port forwarding, or a tunneling tool like ngrok. See Testing Locally for a step-by-step guide.
Data & Design Considerations
All requests and responses are raw JSON with UTF-8 encoding. Use
Content-Type: application/json header. No form encoding.YYYY-MM-DD HH:mm:ss GMT +OFFSET (e.g., 2020-09-17 07:48:22 GMT +0530). The Time field is in UTC; device-local timestamps (like LogTime, OperationTime) may use a different timezone offset.Design your application to accept punches that arrive out of chronological order. When a device was offline, it will push cached punches once reconnected. You may need to retroactively update attendance status (e.g., mark a user who was shown as "absent" to "present").
Sort all punches for a user by
LogTime across all devices, then apply your business logic. Do not rely solely on the Type field (CheckIn/CheckOut) from a single device if the user punches on different machines.A unique string identifier for each operation. For inbound callbacks, it's generated by the Biometric Gateway. For outbound RESTful requests, you should generate a unique one per request (UUID or timestamp-based). The response echoes it back so you can correlate request/response pairs.
Biometric data (fingerprint, face, palm, user photo) is Base64-encoded in the
Data field of the Template object. Fingerprint and face templates also include Size (byte length) and Index (slot number). Card numbers and PINs are plain strings.Pricing & Licensing
Per biometric machine. First year requires API Activation + Yearly License. Subsequent years require only the yearly license renewal. See Cost of API for pricing.
API communication for that device stops until the license is renewed. Your existing data is not affected, but no new callbacks or RESTful commands will be processed.
Yes. The Protocol Engine Lite can be installed on your own server (Windows/Linux) for LAN-only or self-hosted environments. Contact sales@camsbiometrics.com for details.
AI-Powered Code Generator Prompts
Download a prompt file for your server language, paste it into any AI assistant (Claude, ChatGPT, Copilot, etc.), and get a complete working implementation — callback receiver, REST client, and HTML test interface — in a single file.
PHP
Pure PHP · SQLite · No Composer
Node.js
Express · JSON file store
Python
Flask · SQLite · stdlib only
C# (.NET 8)
Minimal API · No MVC
Java
Built-in HttpServer · No deps
Go
net/http · stdlib only
Ruby
Sinatra · SQLite
Download the prompt file
Click your language above to download the .txt file.
Paste into an AI assistant
Open Claude, ChatGPT, or any AI coding tool. Paste the entire prompt content.
Get a complete working file
The AI generates a single file with: Callback receiver, REST client for all 27 operations, and a fully functional HTML test interface. Just set your config values and run.
Testing Locally (Without Deploying to a Server)
To test your callback integration from your local development machine — without deploying to a production server — you need to make your local machine reachable from the internet so the Cams Protocol Engine can POST callback data to it.
Option A: Public IP + Port Forwarding
If your internet connection has a public (static) IP address, you can forward an external port to your local application.
Find your public IP
Visit whatismyip.com or run curl ifconfig.me in your terminal. Note your public IP address.
Set up port forwarding on your router
Log in to your router admin panel. Forward an external port (e.g. 8080) to your local machine's internal IP and the port your application is running on (e.g. 3000, 5000, 8080).
Configure the Callback URL
In the API Monitor, set your Callback URL to:http://YOUR_PUBLIC_IP:8080/callback
Test
Trigger a punch on the biometric device. The Cams Protocol Engine will POST the callback data to your public IP, which your router forwards to your local application.
Option B: Tunneling Tools (No Public IP Required)
If you don't have a public IP or can't configure port forwarding, use a tunneling service to expose your local server to the internet.
| Tool | Command | Notes |
|---|---|---|
| ngrok | ngrok http 3000 | Free tier available. Gives you a public HTTPS URL instantly. |
| Cloudflare Tunnel | cloudflared tunnel --url localhost:3000 | Free. No account needed for quick tunnels. |
| localhost.run | ssh -R 80:localhost:3000 ssh.localhost.run | No installation. Works via SSH. |
Start your local application
Run your callback server locally (e.g. php -S localhost:8080 or node server.js or python app.py).
Start the tunnel
Run the tunneling tool. It will output a public URL like https://abc123.ngrok-free.app.
Configure the Callback URL
In the API Monitor, set the Callback URL to the tunnel URL:https://abc123.ngrok-free.app/callback
Test
Trigger a punch. Callbacks will flow through the tunnel to your local machine in real time.
Demo with PHP Program
A simple PHP example -- create the table, deploy the script, and start receiving attendance data.
Step 1 — Create the MySQL Table
CREATE DATABASE IF NOT EXISTS cams_biometric;
USE cams_biometric;

CREATE TABLE IF NOT EXISTS attendance_logs (
    id            INT AUTO_INCREMENT PRIMARY KEY,
    user_id       VARCHAR(50)  NOT NULL,
    log_time      DATETIME     NOT NULL,
    punch_type    VARCHAR(20)  DEFAULT NULL,
    input_type    VARCHAR(20)  DEFAULT NULL,
    temperature   DECIMAL(4,1) DEFAULT NULL,
    face_mask     TINYINT(1)   DEFAULT NULL,
    serial_number VARCHAR(50)  DEFAULT NULL,
    label_name    VARCHAR(100) DEFAULT NULL,
    raw_json      TEXT         DEFAULT NULL,
    created_at    TIMESTAMP    DEFAULT CURRENT_TIMESTAMP,
    UNIQUE KEY (user_id, log_time)
) ENGINE=InnoDB DEFAULT CHARSET=utf8mb4;
Step 2 — PHP Callback Handler
<?php
// Database config
$pdo = new PDO("mysql:host=localhost;dbname=cams_biometric;charset=utf8mb4", "root", "");

// Read incoming JSON
$rawInput = file_get_contents("php://input");
$data     = json_decode($rawInput, true);

// Parse PunchLog and insert
if (isset($data['RealTime']['PunchLog'])) {
    $log = $data['RealTime']['PunchLog'];
    $stmt = $pdo->prepare("
        INSERT INTO attendance_logs
            (user_id, log_time, punch_type, input_type, temperature, face_mask, serial_number, label_name, raw_json)
        VALUES (?, ?, ?, ?, ?, ?, ?, ?, ?)
        ON DUPLICATE KEY UPDATE punch_type=VALUES(punch_type), input_type=VALUES(input_type)
    ");
    $stmt->execute([
        $log['UserId']       ?? '',
        date('Y-m-d H:i:s', strtotime($log['LogTime'] ?? 'now')),
        $log['Type']         ?? null,
        $log['InputType']    ?? null,
        $log['Temperature']  ?? null,
        isset($log['FaceMask']) ? ($log['FaceMask'] ? 1 : 0) : null,
        $data['RealTime']['SerialNumber'] ?? null,
        $data['RealTime']['LabelName']    ?? null,
        $rawInput
    ]);
}

// Always respond with this
header("Content-Type: application/json");
echo '{"status":"done"}';
?>
Step 3 — Deploy & Test
Create the table
Run: mysql -u root -p < cams_db_setup.sql
Upload the PHP file
Edit DB credentials if needed, upload to your server.
Set Callback URL
In API Monitor, set: https://yourserver.com/cams-callback.php
Punch & verify
Punch on the device, then check: SELECT * FROM attendance_logs;
URL Testing
Before going live, verify your endpoints using Postman. We provide a ready-made collection with all 27 RESTful operations pre-configured.
Postman Collection
Download and import into Postman. Set your base_url, stgid, and auth_token variables — then start testing instantly.
Import the collection
Open Postman → Import → drag and drop the downloaded .json file. All 27 RESTful operations appear grouped by category.
Set your variables
Go to the collection's Variables tab and set:
base_url = your RESTful endpoint URL (from API Monitor)
stgid = your device's Service Tag ID
auth_token = your device's AuthToken
Send requests
Select any operation, edit the JSON body with your values, and hit Send. Verify the response matches the expected format documented above.
Postman Example
Below is a screenshot showing a sample API request configured in Postman. Set the method to POST, paste your RESTful endpoint URL with ?stgid=, and use raw JSON body.
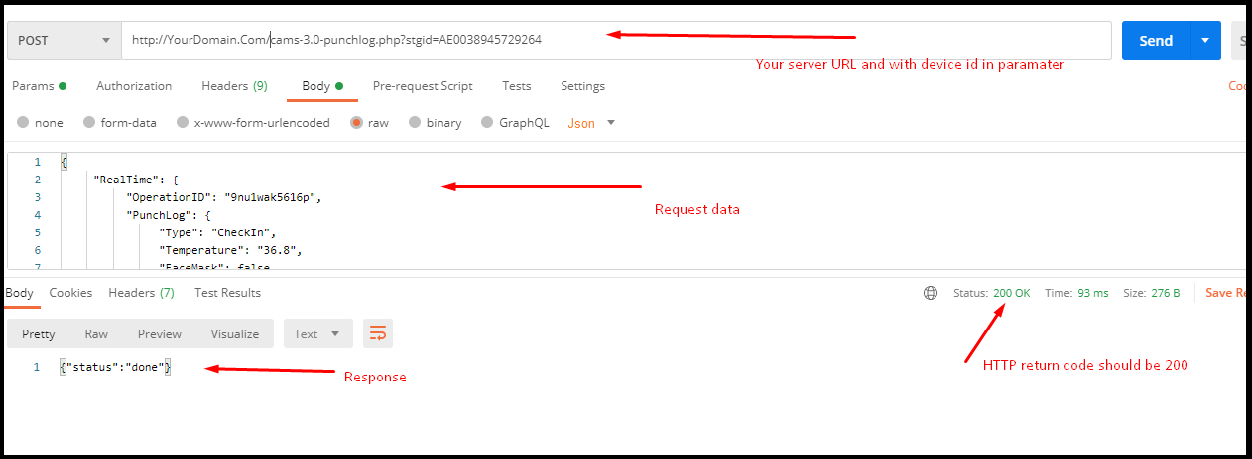
{"status":"done"} with HTTP 200.
Contact Us
For API support, device compatibility, or sales enquiries:
Sales & Support
Developer Resources
Cams Biometrics (Dheeram Innovations Pvt Ltd) — No: 2/98D, 2nd Floor, Cams Biometrics Building, Opposite to Satyabama University, Semmancheri, OMR, Chennai – 600119, India.